Mastering The Foreign exchange Market: Understanding And Using Provide And Demand Charts
Mastering the Foreign exchange Market: Understanding and Using Provide and Demand Charts
Associated Articles: Mastering the Foreign exchange Market: Understanding and Using Provide and Demand Charts
Introduction
With nice pleasure, we are going to discover the intriguing matter associated to Mastering the Foreign exchange Market: Understanding and Using Provide and Demand Charts. Let’s weave fascinating info and supply recent views to the readers.
Desk of Content material
Mastering the Foreign exchange Market: Understanding and Using Provide and Demand Charts

The overseas alternate (foreign exchange) market, a colossal enviornment of worldwide forex buying and selling, operates on the elemental ideas of provide and demand. Whereas technical indicators supply precious insights, understanding and appropriately figuring out provide and demand zones on a chart offers a strong, elementary method to forecasting value actions and inserting trades. This text delves deep into the idea of provide and demand in foreign exchange charting, explaining their identification, utility, and limitations.
Understanding the Fundamentals: Provide and Demand in Economics and Foreign exchange
In fundamental economics, provide represents the amount of a very good or service producers are prepared to supply at a given value, whereas demand signifies the amount patrons are prepared to buy at that very same value. The intersection of provide and demand determines the equilibrium value – the purpose the place the market clears, with all provide matched by demand.
This precept interprets on to the foreign exchange market. A forex pair’s value displays the relative provide and demand for these currencies. When demand for a forex will increase relative to its provide, its value rises. Conversely, if provide exceeds demand, the value falls. Nevertheless, within the dynamic foreign exchange market, these forces are always shifting, creating zones of serious provide and demand that may be visually recognized on value charts.
Figuring out Provide and Demand Zones on Foreign exchange Charts
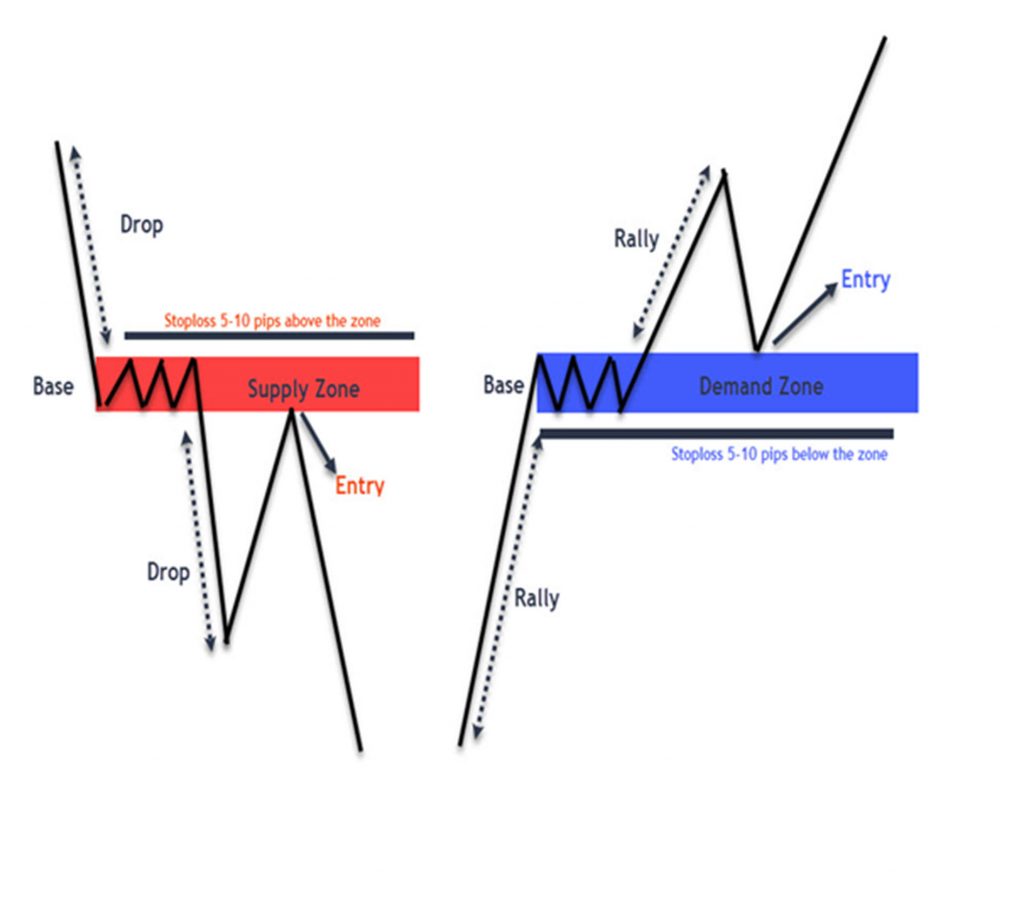
Figuring out these zones requires cautious chart evaluation. They are not represented by exact strains however moderately areas the place value has traditionally struggled to interrupt by. These areas signify important shopping for or promoting stress.
Provide Zones (Resistance): These are areas the place sellers are dominant. A provide zone types when the value repeatedly fails to maneuver past a sure degree, indicating sellers are stepping in to dump their holdings. This creates a "ceiling" impact. Key traits of a provide zone embody:
- A number of swing highs: The value reaches a peak (swing excessive) a number of occasions across the identical value degree, failing to interrupt above it.
- Rejection candles: Candlesticks with lengthy higher wicks (displaying robust promoting stress) usually seem at or close to the provision zone. These candles point out a rejection of upper costs.
- Quantity affirmation: Larger buying and selling quantity at or close to the provision zone confirms the importance of the promoting stress. The next quantity signifies extra merchants taking part within the promoting exercise.
- Clear value motion: The value exhibits a transparent rejection, with a noticeable pullback after trying to interrupt by the provision degree.
Demand Zones (Assist): These are areas the place patrons are dominant. A requirement zone types when the value repeatedly bounces again from a sure degree, indicating patrons are stepping in to buy the forex pair. This creates a "flooring" impact. Key traits of a requirement zone embody:
- A number of swing lows: The value reaches a trough (swing low) a number of occasions across the identical value degree, failing to interrupt beneath it.
- Bullish reversal candles: Candlesticks with lengthy decrease wicks (displaying robust shopping for stress) usually seem at or close to the demand zone. These candles point out a rejection of decrease costs.
- Quantity affirmation: Larger buying and selling quantity at or close to the demand zone confirms the importance of the shopping for stress.
- Clear value motion: The value exhibits a transparent bounce, with a noticeable upward motion after testing the demand degree.
Chart Varieties and Timeframes:
Whereas provide and demand zones could be recognized on varied chart sorts, candlestick charts are usually most well-liked for his or her means to visually signify value motion and momentum. The timeframe chosen additionally performs an important function. Longer timeframes (every day, weekly) usually reveal stronger, extra important provide and demand zones, whereas shorter timeframes (hourly, 15-minute) can spotlight extra rapid buying and selling alternatives. It’s normal apply to research a number of timeframes concurrently to achieve a complete perspective.
Using Provide and Demand Zones in Foreign exchange Buying and selling:
As soon as provide and demand zones are recognized, merchants can use them to:
- Determine potential entry factors: Merchants could look to purchase close to demand zones (anticipating a value bounce) and promote close to provide zones (anticipating a value reversal).
- Set stop-loss orders: Cease-loss orders, positioned simply past the demand or provide zone, assist restrict potential losses if the commerce goes towards the dealer’s expectation.
- Decide revenue targets: Revenue targets could be set primarily based on the gap to the following important provide or demand zone, or primarily based on risk-reward ratios.
- Affirm pattern course: Provide and demand zones can assist verify the prevailing pattern. Breaks above important provide zones usually verify an uptrend, whereas breaks beneath important demand zones usually verify a downtrend.
Limitations and Concerns:
Whereas provide and demand evaluation is a strong device, it is essential to acknowledge its limitations:
- Subjectivity: Figuring out provide and demand zones includes a level of subjective interpretation. Totally different merchants could determine zones in a different way.
- False breakouts: Costs can generally break by provide or demand zones, creating false indicators. For this reason affirmation from different indicators or value motion is commonly crucial.
- Market volatility: Surprising information occasions or market shifts can invalidate provide and demand zones.
- Context is essential: The power of a provide or demand zone will depend on its context inside the broader market atmosphere and pattern. A zone that is important on a every day chart is likely to be much less related on a 15-minute chart.
- Over-reliance: Relying solely on provide and demand evaluation with out contemplating different components, equivalent to elementary evaluation or different technical indicators, could be dangerous.
Combining Provide and Demand with Different Technical Indicators:
For enhanced accuracy, provide and demand evaluation could be successfully mixed with different technical indicators equivalent to:
- Transferring averages: Transferring averages can assist verify pattern course and determine potential help and resistance ranges that align with provide and demand zones.
- Relative Power Index (RSI): The RSI can assist determine overbought and oversold circumstances, offering extra affirmation for potential entry and exit factors.
- MACD (Transferring Common Convergence Divergence): The MACD can assist determine momentum modifications and potential pattern reversals, aligning with provide and demand zone breakouts.
- Fibonacci Retracements: Fibonacci retracements can assist determine potential value targets inside provide and demand zones.
Threat Administration and Place Sizing:
Efficient threat administration is paramount when buying and selling foreign exchange utilizing provide and demand evaluation. Merchants ought to:
- Use stop-loss orders: At all times place stop-loss orders to restrict potential losses.
- Decide acceptable place measurement: Place sizing ought to be primarily based on threat tolerance and account measurement.
- Diversify trades: Do not put all eggs in a single basket. Diversify throughout completely different forex pairs and buying and selling methods.
Conclusion:
Provide and demand evaluation offers a sturdy and elementary method to foreign currency trading. By diligently figuring out and decoding these zones, merchants can enhance their decision-making course of and improve their buying and selling efficiency. Nevertheless, it is essential to do not forget that no buying and selling technique is foolproof. Combining provide and demand evaluation with different technical indicators, coupled with sound threat administration practices, is essential to maximizing potential positive factors whereas minimizing losses within the dynamic and ever-evolving foreign exchange market. Steady studying, apply, and adaptation are important for fulfillment on this difficult but rewarding discipline. Keep in mind that previous efficiency shouldn’t be indicative of future outcomes, and thorough analysis and understanding of market dynamics are essential earlier than partaking in any foreign currency trading exercise.


Closure
Thus, we hope this text has offered precious insights into Mastering the Foreign exchange Market: Understanding and Using Provide and Demand Charts. We hope you discover this text informative and helpful. See you in our subsequent article!